Help:Images
Images, whether photographs, illustrations, videos or other visual material, can often be a wonderful resource for improving an MEpedia entry. At the same time, certain restrictions apply to which images are eligible for use on MEpedia, with respect to copyright, right of privacy, or other considerations. This page explains how to add images to a page, or link to an image from a page.
Finding an eligible image
Some sources of free content that may be usable on MEpedia include:
- commons.wikimedia.org
- search.creativecommons.org
- Flickr - First check the copyright license information for the image you want. If it says "All rights reserved", you can't use it.
- FontAwesome - This site has some logo images available under Creative Commons 4.0 license.
Even if you find an image through one of these sites, you should double-check to make sure it is appropriately licensed for re-use. Occasionally these searches yield an image that does not in fact meet the criteria. If the only image you can find that's properly licensed for use is a video, but you want a still image, you can pause the video and take a screenshot. Again, verify that the license allows this.
First upload the file
Images and other files must be uploaded before they can be displayed on, or linked from, a page. When an image file is uploaded to MEpedia, it will get its own page, with a "File:" prefix. (For example, File:MEupregulatedgenes.png.)
- See Help:Files for how to upload a file to MEpedia. Be sure to remember the name of the uploaded file, because you will need that file name when you add the image to a page.
- Note that photos you take of other people may not be acceptable for uploading to MEpedia, depending upon whether the other people are identifiable, whether they have given consent, and where the photo was taken. Use good judgment. For more information, see more information from Wikimedia Commons.
Using an existing file
Before adding an image that someone else uploaded to a page, check it has a license information box shown on the bottom of the File page.
If it does not, confirm what the license is by searching for the image or image description on the internet and checking for licensing information.
Images uploaded without a license are routinely removed from MEpedia.
Follow the steps on HELP:ADDCOPYRIGHT to add a license to the file.
Displaying an image on a page
In the Visual Editor

- Go to the position on the page where you want the top of the image to appear.
- Click on the very beginning of that line, to place the cursor there.
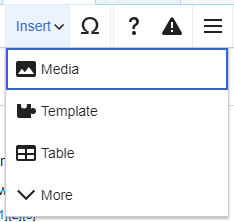
- At the top of the page, click on the Insert menu, and then select Image/File. (or Media in the example image)
- A search box will appear. Delete any words in it, and start typing "File:" followed by the name of the image's "File:" page. (Example:
File:MyImageFile.jpg.) If you can't remember the file name, you may be able to find it in Special:NewFiles or in Special:AllMyUploads. If you haven't uploaded the image file to MEpedia yet, you should first upload it using Special:Upload. - The file may appear below the box as you type, but sometimes you need to type the whole file name.
- Once the file is shown below the search box, click on it once, and then click the "Use this image" button.
- Fill in the "Caption" (description) that will be displayed under the image. The caption should include the author or citation (for journal articles), and the copyright license. (You do not need to mention the copyright license if the file uses the recommended CC-BY-SA-3.0 license or a public domain license.)
- Example caption: Author: Shaw101, License: CC-BY-4.0
- Example caption: Citation: Song and Jason (2005). The BMJ 19(3) p28-31. License: CC-BY-ND-4.0
- Then you should fill in the "Alternative text" box with a brief description of the image, for people who are visually impaired or who have a slow internet connection that doesn't display images.
- Click on the "Advanced Settings" tab on the left: (If you don't see an "Advanced Settings" tab on the left, it might mean that you have just edited an existing image. Due to a bug in the Visual Editor, the "Advanced Settings" tab disappears after you edit an existing image. If this happens, you can click "Cancel", save the page without the new image, and then re-edit the page to insert the new image.) (If you ever need to change the "Advanced Settings" of an existing image, then see "Updating an image that is displayed on a page" below.)
- Under "Position", choose whether you want the image displayed on the left, right, or center of the page. Images are displayed on the right side of the page by default, so don't worry if it only offers "left" and "center" as options- just leave them both alone and the image should end up on the right side of the page. If you want the image to take up the entire width of the page, then un-check the box that says "Wrap text around this item".
- Do not make a selection under "Image type". Leave it as the default, "Thumbnail", which ensures that the caption is displayed properly. (And don't worry if it doesn't display "Thumbnail", because it's set to "Thumbnail" by default.)
- Under "Image size", you can leave it as "Default", which usually works just fine. If the picture ends up too big or too small, you can adjust it later to set a custom size.
- Finally, click the "Insert" button in the top right and the image should appear on the page, with the caption underneath.
- Check to see if it looks OK. If you need to change anything, just click on the picture and select "Edit" to change any of the options or caption.
- Especially check to make sure that the position and size of the image look good, before saving the page. (Due to a bug in the Visual Editor, you can't change these "Advanced Settings" once the page has been saved with the new image.)
In the Source Editor
- Type
[[, followed by the image's "File:" page name, as if you were starting to link to the image's "File:" page name. (Example:[[File:Myfile.png) - Then you must specify an alternate description of the image for the visually-impaired, or for readers with a slow internet connection that doesn't display images. (Example:
|alt=portrait photo of subject) - Then you can optionally specify
|right,|left, or|centerto specify if the image is to be displayed on the right, left, or center of the screen. By default, images are displayed on the right of the screen. If you don't want the text to wrap around the image, you can specify|none, instead of specifying right, left, or center. - Then you must type
|thumbto make sure the image is correctly displayed with a caption. - Then you can optionally specify a size for the image. (Example:
|416x416px) - Then you must type
|, followed by the image's caption. The caption should include the author/citation and the copyright license that goes along with the image:- If the image is from a research paper, the caption should say which research it is, and can be linked to it.
- To include a reference in the image's caption, first cite the reference for the image somewhere on the page. (Example:
<ref name="0">{{cite web|title=MediaWiki - Images|url=https://www.mediawiki.org/wiki/Help:Images}}</ref>) Then include the reference in the image's caption. (Example:<ref name="0">)
- Finally, type
]]. - The final result should look something like this:
[[File:Myfile.png|alt=This is the description for visually-impaired readers.|left|thumb|416x416px|This is the caption. Citation: Jason et al. (2010).<ref name="0"> License: CC-by-4.0.]]
Linking to an image without displaying it
In the Visual Editor
- Highlight the words on the page that you want to link the image to. Click on the link (chain) symbol in the toolbar:

The link (chain) symbol is located to the left of "Cite" in the toolbar. - A search box will appear. Delete any words in it, and start typing "File:" followed by the name of the file. (For example,
File:MyImageFile.jpg.) If you can't remember the file name, you may be able to find it in Special:NewFiles or in Special:AllMyUploads. - The file may appear below the box as you type, but sometimes you need to type the whole file name.
- Once the file is shown below the search box, click on it once and the highlighted words will then be linked to the image's "File:" page.
In the Source Editor
Simply create a link as you would normally, but specify the image's "File:" page, and include a colon at the beginning.
- For example,
[[:File:MyImageFile.jpg]]
If you forget the colon at the beginning, the image will be displayed on the page, instead of linking to it!
Updating an image that is displayed on a page
In the Visual Editor
- If you need to update an image that is displayed on a page, just click on the picture and select "Edit".
- You can update the "Caption" (description) that is displayed under the image. The caption should include the author or citation (for journal articles), and the copyright license. (You do not need to mention the copyright license if the file uses the recommended CC-BY-SA-3.0 license or a public domain license.)
- You can also update the "Alternative text" box with a brief description of the image, for people who are visually impaired or who have a slow internet connection that doesn't display images.
- You can even change the image itself by clicking on the "Change image" button at the bottom left. You will have to specify the new image's "File:" page.
- Due to a bug in the Visual Editor, you can not update any of the "Advanced Settings", such as image position or image size. If you need to change image position or image size, then ask someone at the MEpedia:Help desk to change it for you using the Source Editor.
- Finally, click the "Apply changes" button in the top right.

